Getting Started
Enviro Data Installation
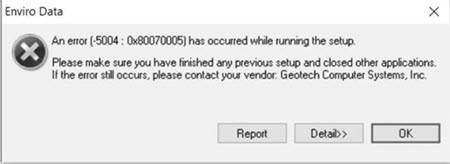
The following error message may occur when you try to install Enviro Data if you do not have administrative rights on your computer. You will either need to sign on with an Admin account to install or have your IT Department do it for you. If you have Admin rights and get this message, you may have to right-click the setup program and choose "Run as administrator."
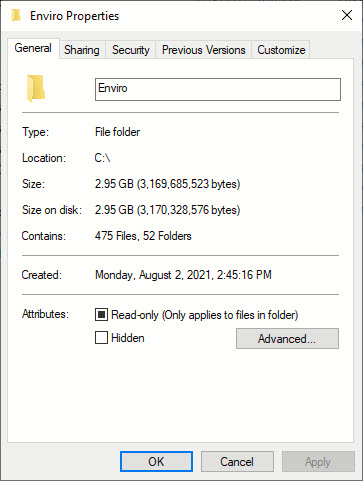
Yes! Enviro Data regularly reads and writes to the folder it is installed in, C:\Enviro\EData8. The settings chosen in many of Enviro Data's forms save their properties in the Settins8 file located in ths folder. Additionally, the license file is stored in this folder.
In order for Enviro Data to work properly and be licensed, you must provide full Read / Write privileges in the C:\Enviro\ folder. Some may ask why C:\Enviro needs privileges, and not just the program folder EData8. While it is not specifically necessary, when a new number version of Enviro Data is released, it will be installed in C:\Enviro\Edata9 so it is best to simply make the whole C:\Envior folder have the same rights now rather than wait for a future issue to arise.
While your own personal computer (one not setup on a company network by an IT Dept.) generally does not need these rights, however, a computer or VM setup by an IT Department generally does, and Enviro Data requires Full Admin privileges to its own folder. (This is one of the reasons Enviro Data in a company environment must be setup using Admin Rights.)
The instructions to make these changes are below. (Note that the look of your computer's forms may be slightly different from the ones below depending on the version of Windows you are using.)
1. Open the Windows File Explorer form.
2. Click on This PC.,
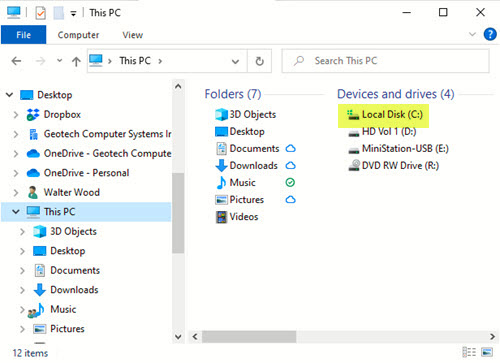
3. Click on Local Disk C.
4. Find the C:\Enviro folder and right-click on it, then choose Properties as shown below to open the Enviro Properties form.
5. Click the Security tab.
6. Under "Group or user names:" click on Users (xxxxxx\Users) as shown below (where xxxxxx is the computer's name).
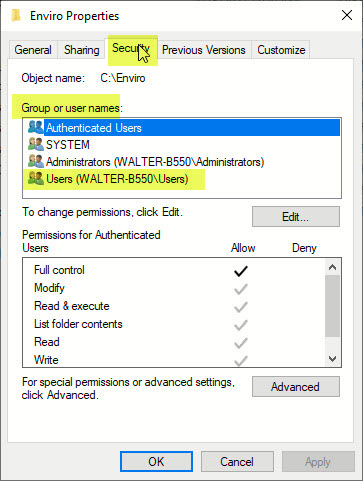
7. Under "Permissions for [Authenticated] Users", in the Allow column, click the check box "Full Control".
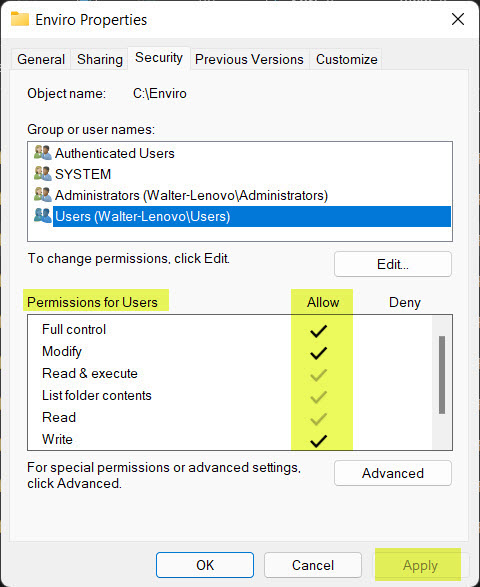
8. Before leaving the Enviro Properties form, click the Apply button in the lower-right and review to see that Full Control has been applied.
9. Click OK to save the settings.
This is rare and typically only happens after Geotech Support has provided an updated version of the Editor or VIewer that may have been built on a different version of Office..
When Enviro Data is installed, it uses specific versions of MS Office "reference libraries" on your computer. If Office or a component of Enviro Data like the Editor or Viewer is changed, you might receive an error similar to the one below. You may should also see another error with an option of Debug the issue.
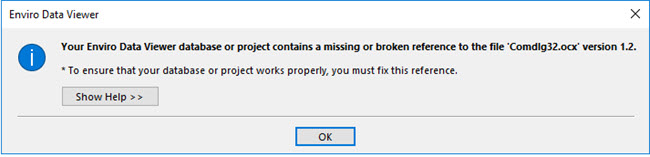
The instructions for fixing this are straight forward and listed below. However, if you feel uncomfortable with these instructions, or run into a problem while following them, we will be happy to do it for you, Just contact us at Geotech Support and let us know when you will be available for an online WebEx meeting.
Note that if you encountered this issue after upgrading your version of Office you may have to run these steps for both the Editor and the Viewer. Because we are constantly making improvements to Enviro Data, if you are running an older copy of Enviro Data, this may be a good time to install the current version. Contact us for a link to the latest version, download it, and install it using the Repair Install option.
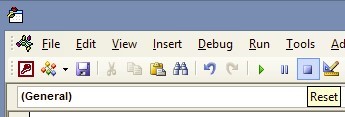
1. On the popup error message, click Debug to start the VBA Editor but it may take a few moments to open. (Note that occasionally it will open under other programs and you will need to click on the icon on the task bar bring it to the front.)
2. Once the VBA Editor opens, click on the square Reset button (just below Tools in the Menu) to stop the code from running.
3. Next click on Tools and then References to open the References form.
4. Scroll down and look for any references with the word “MISSING" in front of them and uncheck them. These will be like "MISSING: Microsoft Excel xx Object library” reference. There may be more than one reference marked Missing and you need to uncheck each of them. Make a note of the ones you unchecked for use in the next step. Note, these entries may have a different version number than the “15” shown below.
5. Scroll down and find the version of the Microsoft Excel Object Library and any others that were "Missing" from step 4 and put a check in each one.
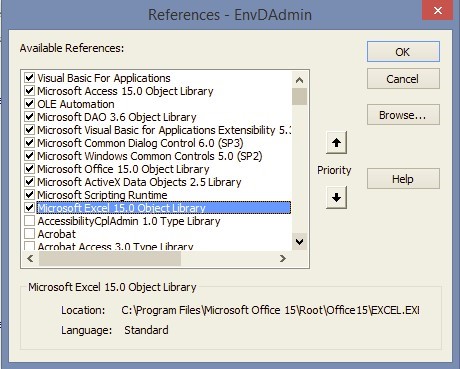
6. Click OK to close the References form.
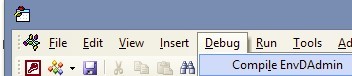
7. Go to the Debug section of the VBA menu and click on Compile (EnvDView or EnvDAdmin).
8. Once the Compile is complete, click Save it and close the VBA window.
9. Back in Enviro Data, reattach to your database.
Enviro Data supports placing the database files on a server, most commonly using Microsoft’s SQL Server or Oracle. Note that only server versions still under active manufacturer’s support can be supported by Geotech.
Note that If you will be connecting to a server database such as SQL Server or Oracle, you need to place your database on the server in the correct format and then create an ODBC system data source on your computer. An ODBC data source includes the network path to the data that the user wants to access, and the information needed to get that data. Multiple data sources can be entered into the Control table in Enviro Data and can be selected by users from the ATTACH DATABASE form in either the EDITOR or VIEWER.
The steps to create an ODBC connection in Enviro Data, can be found in the section Setting Up a New Enviro Data database on SQL in Appendix F of the current Enviro Data documentation which can be downloaded by clicking the Documentation button in either the EDITOR or the VIEWER.
The default folder for the Enviro Data files is C:\Enviro\Edata8. There are desktop icons to run the programs: EDITOR, and VIEWER.
The Enviro Data system consists of many program and data files. These are Access format databases that contain user settings, program file, a blank databases for creating subsets, export files, or saved validation data files.There are also Excel files used a examples for the Tour and training.
The main Access files include:
EnvDAdmin.mdb: This is the EDITOR program for building databases. Data administrators can use the program to import, edit, and review data.
EnvDView.mdb: This is the VIEWER program for selecting and retrieving data.
EnvDData8.mdb: This is a sample database provided by Geotech for users and administrators to learn and practice with.
Settings8.mdb: This file remembers the last database attachment and other control information, and stores saved queries by user. These are separated from the program file so that they are not overwritten during installation of program upgrades.
BlankDB8.mdb: This file is an empty copy of the database. The program uses this file to place data selected by you into a subset database, to create a new database with the lookup tables populated, or to create a reference file to send to your laboratory.
DataDB.mdb: This file contains an empty ValidationImport table used for saving validation data sets.
ExportDB.mdb: This file is an empty database used by the Access One Line Table export.
Controls8.mdb: This file contains copies of tables from the Settings file for use during program upgrades.
Xtab_Template.xlsm – This file is the template used to create the crosstab export in Excel. You should not modify without speaking to Geotech support.
System administrators create ODBC (client-server) databases, which can be company-wide or project specific. The database contains tables and relationships in the format described in Appendix A, Data Model of the documentation.
Access database file locations are dependent on the computer type, maintenance requirements, and local area network setups/performance issues. Each user requires his or her own copy of the Access program and support files, including EnvDAdmin.mdb, EnvDView.mdb, Settings8.mdb, BlankDB8.mdb, DataDB.mdb, and ExportDB.mdb, to run the program and save individual user settings. However, network design and resulting performance of the program may require that files be loaded locally, with a corresponding increase in maintenance time requirements, but possibly quicker operation. It is NOT recommended to have a single shared copy of the program files on a network drive, and have multiple users share that set of program files. This will certainly lead to poor performance and may lead to data corruption.
The database files used to store your data (as opposed to program files) can be located on a local or network machine, depending on database type. An Access data file can be located on an individual machine or on a server for multi-user access. To use a SQL Server or Oracle database, an ODBC data source must be created on the client computer for each database to be used by that client. An ODBC database is usually located on a server. ODBC databases are often located in, and managed by, your Information Technology or similar department.
Trusted Locations need to be configured in Access in order for Access to read and write to the Enviro Data folders.
1. In the top left of the Access menu, click File.
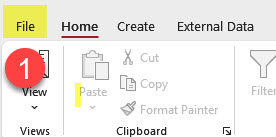
2. Click Options.
3. In the Trust Center form,click Trusted Location,
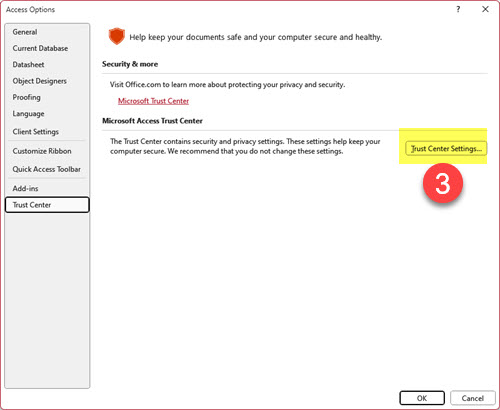
4. In the Trust Center form, click Trust Center Settings,
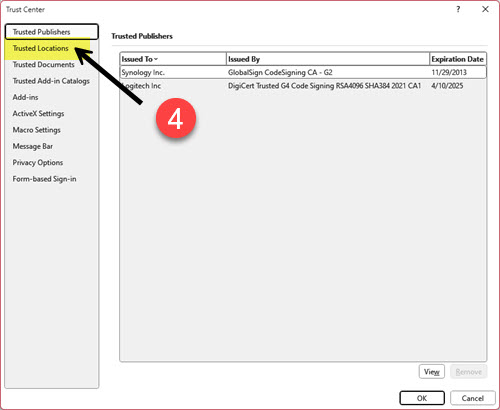
5. In the Trust Center form, click Trusted Locations on the top left.
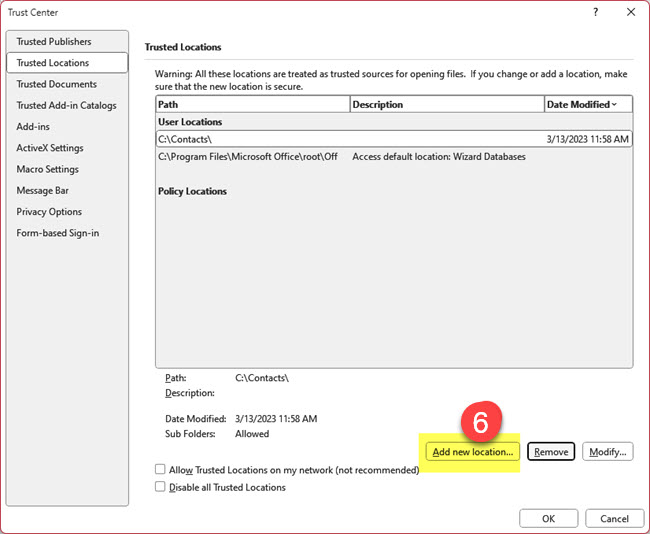
6. In the Microsoft Office Trusted Location form, click 5. Browse, 6. locate and select the folder, 7. check the box for Subfoldersof this trusted location are also trusted,, and finally, 8. click OK.
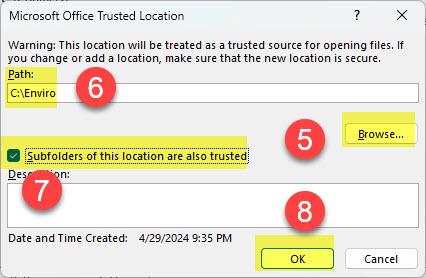
This will take you back to the Trust Center form to click OK.
Back in the Access Options form click OK again.
There are several issues you need to be aware of before, during or immediately after installing Enviro Data.
Installing
You may need Windows security permissions to install Enviro Data. If you receive an InstallShield error like the one below, this is likely a Windows issue. Check with your IT Department as they may have to install the program for you.During
During Installation
An add-in, GeoObjects, is installed after the Enviro Data install completes. It should show a popup indicating that this install has completed. On some computers either the install progress window may not display at all or, remains on the screen after the install has completed. If you see this popup and it does not close, wait a minute or so and click on Cancel or Exit Setup to remove it.
During the install, a sample database called EnvDData8.mdb is copied into the program folder, C:\Enviro\EData8. Enviro Data connects to this database by default when it is first opened. You can use this database to take the Tour in both the EDITOR and the VIEWER to learn how to use the program.
After Installation
The Enviro Data installation should add desktop icons for both the EDITOR and the VIEWER. Sometimes these icons are hidden and may not display. To correct this either right click on the desktop and select Refresh or push F5 on your keyboard to restore them. (You may be asked to enter your Window's credentials when you do this.)
The first time you open the Editor and/or Viewer, you may see a display a bar shown below. Click on the bar, select Enable Content, then Enable All Content and this message will go away. You only need to do this once for each program. If the bar is partly obscured by the splash screen, you can wait a few seconds and then dismiss it.
![]()
You will be asked to enter a software key to license the program. You should have received this key when you purchased Enviro Data. If the key you have been given is for a concurrent license, you will need to follow the instructions to set that up.
If you do not enter a key and leave this form blank, you are given 7 days until the program stops working. If you are evaluating Enviro Data and need more time, you can contact Geotech for a code to extend your evaluation to 30 days at no charge.
See the FAQ in this section on Do I need Read/Write privileges in the Enviro Data
You must enable Trusted Locations by following the steps.
Enviro Data can be installed either from a file downloaded from Geotech or from a network location.
NOTE; Enviro Data installs to C:\Enviro\EData8 folder and we recommend that you do not change this setting. This greatly help Geotech to support you should a problem arise. However, if you have installed to a different folder or to a network drive and want to change it back to the recommended folder, you should Uninstall Enviro Data and then reinstall. In all cases, if during the install or upgrade if you are asked to do a Repair Install, use that option!
Use the following steps to install Enviro Data and applies to both a new installation or an upgrade of the full program.
- You may need Administrator privileges to run the Setup program. You can enter credentials during Setup in the User Access Control dialog. If you do not have Admin access, you will need to have your IT Dept. do the installation. You may also need to right-click the setup program and choose "Run as Administrator."
- You can install Enviro Data using the file downloaded from Geotech. If you are on a network, your system administrator will supply the directory where the Enviro Data installation program is located.
- All Microsoft Office programs (including Access) should be closed to permit the installation program to install any updated files.
- Use Windows Explorer to find the EnviroData8Setup.exe file, located on your hard disk where you saved it during download or on your network. (In some cases, this file may have a different name, or the .exe extension may not be visible.)
- Double click on EnviroData8Setup.exe.
- When you install a new program in Windows, Microsoft Defender may check to see if the program is a recognized app. Since Enviro Data and some other programs from smaller software publishers are not frequently seen, Windows may not recognize them and pop up a warning that reads “Windows has protected your PC.” Since you know the source of the Enviro Data install, simply click on the on the text below the warning that reads More info. This will pop up a second window with two buttons. Clicking on the Run anyway button will allow the Enviro Data install program to run.
- Once the install starts, you may see the normal Windows User Account Control warning about an unknown program. Click Yes to continue the install.
- If InstallShield displays the Setup Options screen, select the “Repair” option.
- The InstallShield Wizard for Enviro Data will ask if you would like to continue with the installation. Click Next. Click on Yes after reading the license agreement. In the next box, CHOOSE DESTINATION LOCATION, click on Next to install Enviro Data in the default pathname, or select Browse to choose your own. We strongly recommend that you install it in the default location, at least at first, to simplify startup and technical support. A SETUP STATUS box comes up while the installation process begins writing the program and its associated files to your disk drive.
- The install program next copies the Enviro Data files to your computer hard drive.
- Towards the end of the install, a second installation program may run that installs the map control. Occasionally, this second install will simply ends without saying it has completed. This is OK.
When the installation has completed, the InstallShield Wizard will display the INSTALLATION COMPLETE form. Click Finish.
After installing open the Editor first. Go to Attach Database and attach to your production database.
If you have installed an update to Enviro Data, the database table structure may need to be updated to the current version. See What are the steps to upgrade an Enviro Data database to a newer version?
Also, the first time you open the Editor and Viewer a message may display informing you that the Settings file needs to be updated. Click OK, the updates take only a few seconds to complete.
You are now ready to use Enviro Data. In some cases, you may be asked to reboot your computer after the installation completes. You may also need to Refresh your Desktop to display the correct Enviro Data icons. This can be done by a mouse click on the Desktop and pressing F5.
Either 32 or 64-bit versions of Office 365 are recommended and it does not make a difference which version in terms of the "Bits" of MS Office you install. Enviro Data will automatically select the correct version, 32 or 64-bit automatically.
However if you are not using Microsoft (Office) 365, you should ensure that all of your Office programs (Word, Excel, Access, etc.) are of the same version and bits. For example, do not use Office 2013 with Access 2016 and/or mix 32- and 64-bit versions together.
Note that the Map feature is only supported in the 32-bit version of the Enviro Data Viewer.
Initial Setup & Steps
Database applications change and grow over time. Many factors impact needs and performance including the number of concurrent users, the network environment, throughput, latency, the size of the database, peak usage times, and expected growth rates. In short, if your database solution is successful, it probably needs to evolve. Fortunately, Access has an evolutionary path, from simple to advanced, that you can take over time to effectively scale your solution.
Enviro Data uses both front-end and back-end client relational database files with many tables, forms, modules and other objects. Both of the front-end files (Editor and Viewer) are Access databases that attach to a back-end database file where the actual data is stored. There are also settings for the front-end options that are stored in a Settings file that is also an Access database linked to the front-end clients., the Editor and a Viewer. The back end can be in Access, Microsoft SQL Server, Azure SQL or Oracle. Where the backend database is in Access, specific considerations must be made as to how it can be shared and where it can be stored. This is not an issue with SQL or other Enterprise storage options.
For an overview on sharing a single back-end Enviro Data database locally or a remote desktop, on OneDrive/SharePoint (not recommended), or on a sever, please see Ways to share an Access desktop database.
Although you can save an Access database file to OneDrive or a SharePoint document library, we recommend that you avoid opening an Access database from these locations. The file may be downloaded locally for editing and then uploaded again once you save your changes to OneDrive or SharePoint. However, if more than one person opens the Access database from OneDrive, SharePoint or DropBox, multiple copies of the database may get created and some unexpected behaviors may occur. This recommendation applies to all types of Access files including the Enviro Data Editor and Viewer, a single database, a split database, and files with the .mdb, .accdb, .accdc, .accde, and .accdr extensions. While SharePoint shares some features with databases and is a great tool for document management, it is not designed to be used as a database and it falls short in supporting all common database functions. For more information on deploying Access, again please see Ways to share an Access desktop database.
Additionally, if you are using a VM or Azure Virtual Desktop where multiple users be using the same Access files-- Editor, Viewer, and Settings -- concurrently, these files must be located where only a single user can access them. Contact Geotec support for more information on these types of shared setups.
Another factor to be considered is that you cannot create a new database with a path or file name that contains a space in it. Once the database has been created, this is no longer an issue. However, when updating an Enviro Data database to a new version in some cases a new file may be created and the issue with spaces applies.
Want to combine and enhance both Access and SharePoint? To do so, you can import, link, or move data between them. Importing creates a copy of the SharePoint list in an Access database. Linking connects to data in another program, so that you can view and edit the latest data both in SharePoint and Access. Moving creates lists on the SharePoint site that remain linked to tables in your database and maintains their relationships. [SharePoint Lists have a very limit capacity and will not support an Enviro Data database.]
Although you can save an Access database file to OneDrive or a SharePoint document library, we recommend that you avoid opening an Access database from these locations. The file may be downloaded locally for editing and then uploaded again once you save your changes to SharePoint. If more than one person opens the Access database from SharePoint, multiple copies of the database may get created and some unexpected behaviors may occur. This recommendation applies to all types of Access files including a single database, a split database, and the .accdb, .accdc, .accde, and .accdr file formats. For more information on deploying Access, see Import, link, or move data to SharePoint.
For an overview on sharing a single back-end Enviro Data database locally or a remote desktop, on OneDrive/SharePoint (not recommended), or on a sever, please see Ways to share an Access desktop database.
Because of a known limitation with Microsoft Access, you can only create a database in a folder that has a path with no spaces including the filename. Once the database has been created, it can be named any valid filename, and placed and used anywhere you wish, but you can't CREATE it with a name like My Database, or in a folder like My Documents.
This no spaces restriction also applies when mapping a drive path that contains spaces. but the path name does not, creating a subset database or upgrading a database to a new version.
After installing Enviro Data on a new computer, close both the Editor and Viewer, then in the Enviro/EData8 folder, find and delete the file named “eKey.lck”. Next, re-open the Editor and enter the License Key in the SETUP LICENSE form. Once the key is entered, you will use this form to point this computer to the lock file called GCSLicense.mde somewhere on your server.
If you cannot locate the license file, go to another licensed computer and using a text editor like Notepad, open the file GCS.lic in this computers Enviro Data directory, C:\Enviro\Edata8. In that file you will find the location of the license file that you can use with the new computer. However, when using this file be careful not to change anything and close this file without saving it.
If you have problems with the above, contact Support and we can setup a Teams meeting to assist you.
Enviro Data Single User is licensed on a per-user basis, meaning that a license is required for each computer on which the software is installed. For a modest additional cost, users in your organization can share your Enviro Data licenses. This is a great way to provide the software to occasional database users at a very low cost. With Concurrent Use licensing, the software can be installed on as many computers as you wish but can only be used concurrently by the number of users that you have purchased Concurrent Use licenses for. This can be setup for the full Enviro Data package and/or the VIEWER only option.
To use Concurrent Use licensing, install the lock file (supplied by Geotech) in a folder (usually on a server) that is visible to all prospective users. This file, GCSLicense.mde, keeps track of how many licenses are available and in use. For a virtual machine (VM) it can be placed in the Enviro folder. For more than one VM, it can be placed on a shared drive. For a SQL back-end, either would be fine.
The program also allows you to “check out” a license so you can use Enviro Data while not connected to the network. Note that until this license is checked back in, it will not be available to any other users. However, the lock file will allow for a fixed number of overuses for emergency situations. If you exceed your licensed usage, both you and Geotech will be notified.
If you have purchased or upgraded to Concurrent Use licensing, contact Geotech technical support if you need help in installing and setting up the lock file.
On the main screen of both the Editor and Viewer are links to the Getting Started document, the full User Documentation and a self-guided Tour where you are taken through the most commonly used features of Enviro Data. Since the User Documentation is updated on a regular basis, check back on a regular basis to learn about new features.
Check this Frequently Asked Questions section to see if your questions have already been answered.
Request support from Geotech at support@geotech.com. When asking for help, please be specific, providing screen shots, and include the version of Enviro Data you are using,
The data hierarchy in Enviro Data has four major tables, Sites (projects or facilities), Stations (locations of samples or observations, such as soil borings or monitoring wells), Samples, and Analyses. Enviro Data uses a database feature called Referential Integrity to protect your data, and that means that the hierarchy is strictly enforced. So to add Stations, Samples, and Analyses, you will need to have at least one Site. Here's how to do that.
1. On the EDITOR, in the Import / Edit section, click on Sites.
2. Enter a Site Name and State at the top of the SITES form. All other fields are optional. Click Done on the upper right of the screen when finished.
3. The next data element to enter is Stations. You can type them in, as you did Sites, but often it's easier to import them, especially if you already have them in digital form.
4. Using the template ImportStation8.xls, create an Excel sheet with your station information. ImportStationExample8.xls is an example of a compete stations import file. These two files are placed in the Enviro\Edata8 folder in Windows Explorer when Enviro Data is installed.
Enviro Data uses lookup tables to enforce data consistency, expand codes, and save storage space. These tables are sometimes called Valid Value Lists. Lookups include Station Types, Matrix, Parameters, Units, and many more. Some you will use, and others you may not need. Before starting with a new project you might want to modify the contents of the lookup tables to suit your project needs. When you create a new database, the lookup tables are brought into the new database from the database you are currently attached to. For your first database, the lookup tables will be from the sample database provided with the software (EnvDData8.mdb).
You can view the existing lookup values, and modify them as necessary. As you create more databases for different types of projects, these lookup tables can evolve. For each new database, you should use an existing database that will have the most similar lookup table contents, and use that to create the new one.
1. Click Maintain Database in the Setup section of the EDITOR MENU.
2. Click on Lookups Report, and print it if you wish. Then close the report, and the MAINTAIN DATABASE form.
3. On the EDITOR, again under the Setup section, click on Manage Lookups. This screen shows the lookup tables that you can edit.
4. Click on one of the buttons, such as Sample Matrix, to open the editing form. Modify the values as necessary, and then close the form.
Note that in order to maintain referential integrity in your database, you cannot modify any lookup code that is in use in another table. You are able to modify lookup's description however. For example, is the lookup for Sample Martix has a code of "u" for "Ground Water" is used for an analyese, you cannot change the "u" but you could change the description to "Groundwater" if you so chose.
You should be aware of the following issues during or immediately after installing Enviro Data.
During the Installation
You may need Windows' security permissions to install Enviro Data. Check with your IT Department as they may have to install the program for you.
During the install, the example database called EnvDData8.mdb is copied into the program folder, C:\Enviro\EData8. Enviro Data connects to this database by default when it is first opened. You can use this database to take the Tour in both the EDITOR and the VIEWER to learn how to use the program.
An add-in, GeoObjects, is installed immediately after the Enviro Data install completes. It should show a popup indicating that this install has completed. This installation generally only takes a few seconds. However, on some computers either the install progress window may not display at all or, remains on the screen after the install has completed. If you see this popup and it does not close, wait a minute or so and click on Cancel or Exit Setup to remove it.
Read the FAQ in this section on Do I need Read/Write privileges in the Enviro Data.
Immediately after the Installation
The Enviro Data installation should add desktop icons for both the EDITOR and the VIEWER. Sometimes these icons may not display but are hidden. To correct this either right click on the desktop and select Refresh or, push F5 on your keyboard. Either of these actions should restore them. (You may be asked to enter your Window's credentials when you do this.)
Running Enviro Data for the first time.
The first time you open the Editor and/or Viewer, you may see a warning just below the Ribbon Menu (see below). Click on the Enable Content button. This will cause Access to Enable All Content (like Macros) and close the warning. You need to do this once for each program. If the bar is partly obscured by the splash screen, wait a few seconds and then click the button.
![]()
You will be asked to enter the software key given you when you purchased Enviro Data. If this key is for a concurrent license, you will need to follow these instructions to set that up.
If you choose to not enter a key and leave this form blank, you are given a 7-day trial and will need a valid Key after that time. If you are evaluating Enviro Data and need more time, you can contact Geotech for a code to extend your evaluation to 30 days at no charge.
You must set Trusted Locations by following these steps.
Many clients with larger database want to keep Enviro Data database on SQL Server for performance and safety reasons. To do this you need:
1. A computer to run SQL Server on. This could be a regular computer, but a server class machine would be preferred. The computer does not need to be dedicated and it can be used for other things, given significant resources. It could also be an Azure VM with SQL Server.
2. A recent version of Microsoft SQL Server. although anything newer than 2016 will work. After some recent bad experiences (poor performance), we do not recommend using SQL Server Express. Although it works for some clients, you may not be able to upgrade your data to the full version. .
3. A copy or the Enviro Data database in SQL Server format. Geotech can migrate your current Enviro Data Access database file(s) to SQL Server for you, if needed.
4. A SQL Server license from Geotech.
5. A Client Access Licenses (CALS) for each named user.
6, An ODBC connection set up on each computer that needs to connect to the SQL database.
Error Messages
If you have imported an EDD and received a large number of Duplicated or Superseded records, you probably should undo the import file and learn more about how Duplicates and Superseded results are handled in Enviro Data before trying to import them again.
Undoing an import is simple and can be done by going to the Import Wizard form and clicking on Undo A Previous Import. This will display a list of EDDs imported where you can select the problem file. Before clicking the Undo Selected Import button be very careful that you select the correct file and that you have a copy of the file being deleted so you can re-import it later. Typically, all you need to do is to select a different choice from the Duplicates & Supersedes radio buttons for a new import.
An explanation of how Duplicates and Supersedes are handled follows.
Enviro Data allows duplicated data at both the sample and analysis levels. The Duplicates and Supersedes section of the Import Wizard - Data Checking Options form provides several options for handling of duplicated data. If you do not have the Duplicate and Superseded fields correctly populated in your import file, you MUST select one of the following options, which uses additional fields to determine duplicate samples.

Options for Duplicates
Auto - This option looks for unique samples based on StationName, SampleDate_D (without time), SampleMatrixCode, SampleTop, DuplicateSample, SampleBottom, FilteredSampleCode and QCSampleCode or LabSampleID (if QCSampleCode is ‘Unknown’). If all of these are the same for the next sample, then the DuplicateSample field is incremented.
The recommended import format contains a QCSampleCode field. The import logic utilizes this field for ordering and assigning the DuplicateSample number. Enviro Data groups samples by the unique fields, orders the records based on the DuplicateOrder field in the QCCodes table, then increments the DuplicateSample number by comparing the QCSampleCode of each sample. These codes can be entered by the lab or by the data administrator before import. If the QCSampleCode is not known or is left blank, it defaults to “Unknown”. The code then compares the LabSampleID numbers of each sample to set the DuplicateSample number.
Field ID - This option looks for unique samples based on StationName, SampleDate_D (with time), SampleMatrixCode, SampleTop, SampleBottom, DuplicateSample, FilteredSampleCode, QCSampleCode and FieldSampleID. If QCSampleCode is ‘Unknown’ then it just looks at FieldSampleID. If all of these are the same, the DuplicateSample field is incremented.
Alt ID - This option looks for unique samples based on StationName, SampleDate_D (with time), SampleMatrixCode, SampleTop, SampleBottom, DuplicateSample, FilteredSampleCode, QCSampleCode and AltSampleID. If QCSampleCode is ‘Unknown’ then it just looks at AltSampleID. If all of these are the same, the DuplicateSample field is incremented.
For these import options, correctly assigning QCSampleCode is crucial to identifying original vs. QC data as the QCSampleCode field is used to correctly identify original data vs. QC data.
Clients who are dealing with large amounts of QC and multiple samples per day may want to consider removing the Duplicate = 0 and Superseded = 0 defaults on the SELECT DATA screen. If you need to remove this, be aware that this will be changed back to the default with any new program updates. Call Geotech for more information about changing this program feature.
If you are importing data with QC sample information, you must populate the DuplicateOrder field in the QCCodes lookup table before importing. The Import Wizard uses this field to set your duplicate values based on the duplicate order. For example, if the duplicate order for your QC codes were Original = 1, Duplicate = 2, and Split = 3, then for samples with those codes you would end up with duplicate sample numbers of 0, 1, 2 respectively.
EDD - The next option uses the duplicate and superseded values as they are contained in the import file. Use this option if whoever is providing you with the data sets the values correctly in the EDD.
Lab ID - The final option uses the laboratory identification number from the import file to determine duplicates and superseded values.
Set Initial Dup/Sup to Zero - This option sets both the Duplicate and Superseded fields to zero prior to import.
Options for Superseded Analyses
Superseded values for are set using the unique key of SampleNumber, ParameterNumber, Superseded, AnalyticMethod, LeachMethodCode, ReportUnitsCode, Basis, FilteredAnalCode, QCAnalysisCode and LabSampleID. Unless the EDD option is checked, when a new analysis is imported matching this unique key is imported, the Superseded field for the original analyses is incremented.